A Freshen Up…

Earlier in the week, I posted a blog called Spring has Sprung which listed many reasons why I love this time of year! One thing that I mentioned that I always do at this time of year is give my house a really good clean and along with that always comes some resorting and decorating! It’s the time of year where I like to give my home a freshen up!

We’ve lived in our house now for over a decade. It’s gone from a dark brick and yellow roof to a latte colour render and burgundy roof. We’ve converted our single garage into a lounge room, painted several feature walls, completed renovations on the kitchen, bathroom and pergola and added our touch to the front and back gardens. I’ve changed the decor more times than I can count lol, yet we still call our home, the place we call our castle, a work in progress!

We have discussed and even looked at the prospect of moving, but we always settle on staying in the place we have created so many memories in. It’s our first home. We brought all our babies home to this house. Kane asked me to marry him in our home and now the kids feel safe and secure in the place they call home! There are so many positives to staying here. We live in a cul-de-sac that the kids play on all the time. We live on a 900 square metre block and we have awesome neighbours. Most importantly we are surrounded by my beautiful family who help us out when we need it!

We have lots of vision for our house that involves a pool and room extensions. Plus if we stay where we are, I won’t have to rush back to work anymore than my two days a week and we will always be able to afford going away on holidays….the positives at the moment definitely out way the push to move!

So far this spring, I’ve gone through every room in the house, given it a good clean and sort and added some kind of new decor. I’ve changed some colour schemes and it’s amazing how one new decorating piece can brighten up a room. You would think that after living in the same dwelling for 10 years it would be in good order…the answer to that would be no lol! After this clean up and kull, I feel our house is the most organised it’s ever been. I’m evolving over time and so is our home…another 10 years and it should be exactly how we want it lol!

This is what I’ve created…
Kitchen

20130929-155029.jpg

20130929-155042.jpg

20130929-155049.jpg
Our kitchen isn’t the largest in the world, but I’ve made it as practical as I can and love my red decor which matches with the red splash in my bench tops.

20130929-160142.jpg
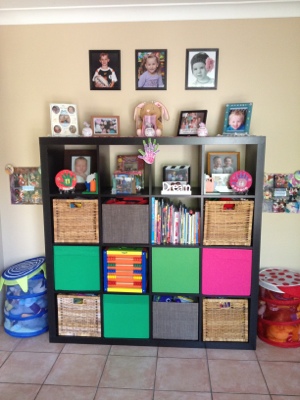
Our dining room table is where photos of my beautiful nana sit:)

20130929-161221.jpg
This year’s handprints needed revamping to the whole display just to fit them in. Next year I’ll have to think of something!

Bathroom

20130929-155300.jpg
I love my light and airy bathroom. I’ve gone with a hot pink and chocolate-brown decor which matches in well with my bedroom as it’s a two-way bathroom!
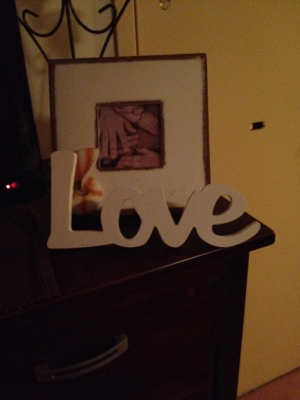
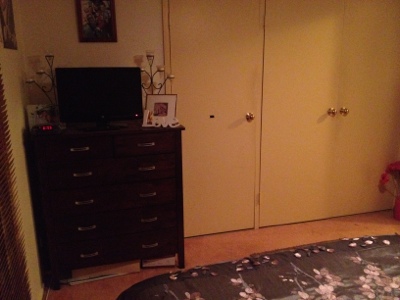
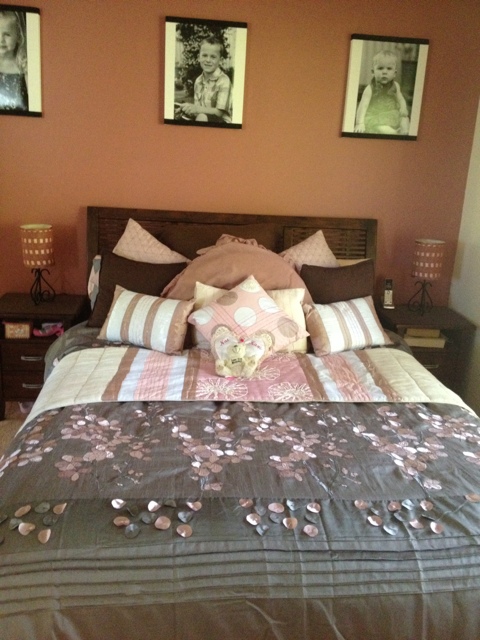
Our bedroom

20130929-155533.jpg
After redecorating our bedroom last year, I finally gave in and have gone with a black, white and hot pink decor to match my canvases. I was a bit unsure about the black, but now I LOVE it!
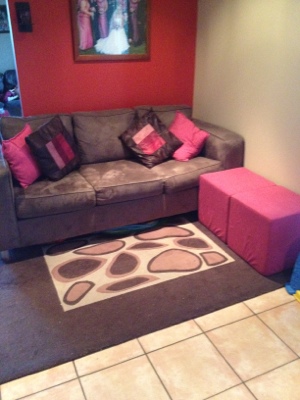
Lounge room

20130929-155746.jpg
I’ve kept my red and chocolate-brown decor in this room. My plan for the future in this room is a new corner lounge and carpet. We are just waiting for Mia to grow a little older:)
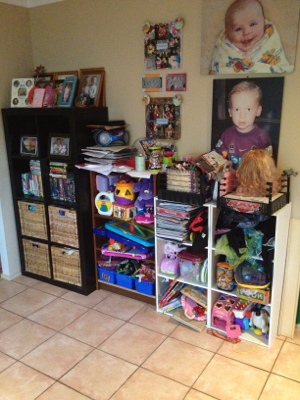
Toy room

20130929-160314.jpg

20130929-160320.jpg

20130929-160344.jpg
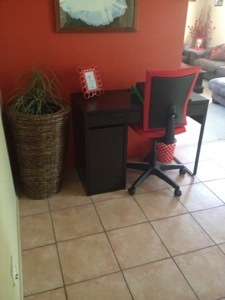
My latest furniture purchase is our new desk from Ikea. It fits so nicely in the kid’s toy room and they love it!! I can’t believe it’s been a year since I gave the toy room a complete face lift!!

Out the back

20130929-160618.jpg

20130929-160624.jpg

20130929-160632.jpg
Our dog ruined the bottom of our screen enclosure and took over the outdoor lounge setting. Thanks to Sunset Signs, we now have new coverings (to keep the dog out) with a beautiful ocean print and new pillows for the lounge. It’s the cleanest our pergola has been in months…lucky we love you Sonny!!!

Out the front

20130929-160927.jpg

20130929-160936.jpg
New pots and plants that I pottered using plants from our own garden. Thank you to my daddy who taught me all my gardening tricks!

Our new blinds

20130929-161422.jpg

20130929-161427.jpg
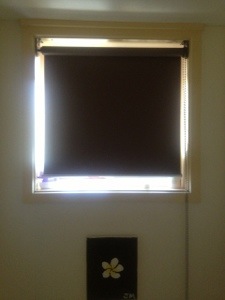
After 10 years our blinds we looking a bit sad and faded, so we replaced all the living areas and bedrooms with the wide timber blinds and the bathroom, toilet and kitchen areas with roman blinds. Thank you to my wonderful husband for installing them:)

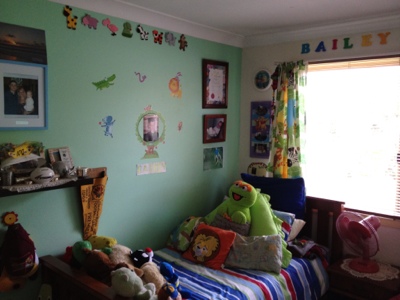
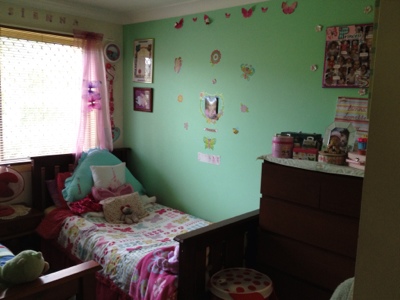
That is what I’ve been working on over the past couple of months! So much achieved, yet I still have a list as long as my arm lol! My next big project over the christmas holidays is doing a major overhaul to the kid’s bedrooms (hence why I didn’t show any photos). The girls will be going in together and having an ‘owl’ theme and Bailey wants an ‘NRL’ theme. Another big project for this house and has been an ongoing room for years is my laundry – I will finish it even if it kills me lol!!!!

So watch this space for my latest projects in our very own castle!

Outdoor Facelift!

My love of decorating never leaves from year to year, but it does come in waves! In the past 10 years of living in our home I have lost count of the number of of times I’ve bought new cushions to brighten a room up or changed the colour scheme of our bedding. I usually start with one room and go from room to room which takes a while and then by the time I’m back to the beginning, it’s been a few years and I’m ready to start all over again! But as they say a change is as good as a holiday!

The past 6 months I have been decorating a fair bit. It started with our bedroom, then the toy room, bits and pieces in all the other rooms but at this time of the year and leading into the festive season, I feel the outside is just as deserving of a facelift as the inside! We have a huge outside that is just as big as the inside of our house! When tidying up and giving the outside a facelift I always start with the pergola. Our pergola is screen enclosed so we treat it as another room.

In the past it was an open pergola with exposed concrete. About 5 years ago now, we screen enclosed it to make it our ‘entertainment room’ and had the ground covercreted to create a tile look! It was the best thing we did! We also added a nice big sail out the back so we still have an ‘outdoor’ shaded area where we often have afternoon tea or the occasional dinner on a hot night!

This week I was sick of looking at my faded cushions and covers on my outdoor lounge, so to create a fresh look, I purchased some cushions from Big W and Ikea and turned the seat covers inside out so they now look brand new! My very talented mother made the covers and I was going to buy more material so she could make new ones, but now I’ll have at least another couple of years up my sleeve before that has to be done again!

20121026-142739.jpg
Cushions and seat covers before…..

After…..

20121026-142840.jpg

20121026-142904.jpg
I’m so happy with how it turned out! I love the leaf pattern on the cushions, as soon as I saw them I thought they would look great for an outside cushion and the red makes the area look vibrant and matches in perfect with the decor and my rose garden in the background!

We have big plans for our outside, but all in good timing! Our biggest plan is to eventually put a pool in! In a couple of months time to celebrate living in our home for 10 years, I will be writing a blog called ‘Before and After – 10 Years On’ which will illustrate how much we’ve done to our home over the past 10 years!

Our Toy Room Facelift!

It’s only taken 6 and a half years of being a mum and I finally have an organised and functional toy room! This room has been our toy room for about 4 and half years now but it’s the best it has ever looked after its recent facelift!

Having only 3 bedrooms and 5 of us, it doesn’t leave a lot of room in the kid’s rooms for toys, but fortunately enough having an extra living area the kids can have a room where they can relax, play, read and watch tv!

This room is not a massive space, but big enough for the kids to spread out on the floor and play the Wii. Over the years my problem was not having the right storage. The kids have always been happy with how it was, but now they love it….and so do I!

The before shots:…….

20120924-154441.jpg

20120924-154512.jpg

20120924-154535.jpg

20120924-154547.jpg

While it was always easy access for the kids to grab their toys, I was so sick of how untidy the open shelves looked, so I added to the Ikea’s range of expedits that I already had! This has made a huge difference! Between adding in an extra lot of boxed shelving, a new television, some bright cushions and a revamp of some photos and frames, the room is exactly how I’ve envisioned it to be for a very long time! It was a much bigger job than expected. Just going through all the toys took ages!!! The kids were so great though. They got rid of what they don’t play with anymore and were more than happy to donate them:)

This is how it looks now:…..

20120924-155530.jpg
I love my new expedit…put together all by myself! Everything is all organised into categories or by child! So far the kids have coped well with knowing what goes where (helped by letting them help me organise it all)!

20120924-155713.jpg
Our original expedit came in handy for a television unit. It fits all the DVDs and controllers nicely!

20120924-155832.jpg
Cushions and rugs are from Ikea….perfect amount of colour that was needed!

20120924-155946.jpg
The kids table and chairs many years old now, but also from Ikea:)

20120924-160216.jpg
Neat, tidy and plenty of space to spread out!

It’s the personal touches this room now has that makes it meaningful to our home that we have created for our party of 5…..

20120924-160353.jpg
A plain lamp bought from Ikea and decorated by myself with the kid’s names on it!

20120924-160450.jpg
These photo blocks were bought for Bailey when he was a baby….now I have 3 babies they are perfect to finally use – Mia loves them!!!

20120924-160605.jpg
These three photos chosen depict each of our children’s personalities and shows off how adorable they are:)

20120924-160711.jpg
I love our recent family portraits. Even though they are almost a year old, I love them more everyday! I made these on small canvases and think they look lovely sitting on my Ikea shelf….this shelf has been used by the kids for years to roll their cars down, now I’m finally utilising it:)

It’s nice for the kids to have their own living space which is right now ours, so they still feel safe and secure when they are doing their own thing! I’m really happy with how the toy room turned out and am especially happy that I only spent just over $500 to get it looking how it is….thanks to Ikea and Big W. Like I said it was a massive job, but I know the kids will appreciate it for many many years to come:)!

20120924-184813.jpg

Gotcha…that they did!!!

It’s a well known fact that I am a photoholic! I love taking them, printing them off and then displaying them around my home! Sometimes I find a nice frame to put a photo in and sometimes I’ll use my love of craft and make a canvas. Either way it’s all about displaying a captured moment that represents love, a personality, fun and the like! Each year since we started creating our own family, I have always spent the time and money getting professional portraits of the children! I religiously used Pixi photos to do our portraits as that is what my parents used when we were little. Then a few years ago a good friend of ours started coming to our home to take photos of us in our yard, more natural shots which are my favourite.

After going from a studio to a location I swore I would never get studio shots again. Then a few weeks ago Mia and I spent the day together and were asked by Gotcha Photography (they were in the middle of a shopping centre) if I would like my daughter’s photo taken. I was quite reluctant as Mia had a cold and my rule was no studio photos anymore!!! So much for my mid year resolution of saying NO!!! Anyway I thought why not might be a bit of fun and I needed a nice photo of Mia for our new toy room!

Mia being Mia wasn’t very impressed and made the ladies work so hard for a smirk let alone a smile! After 15 minutes, which I was happy with some of the shots they had taken, they proceeded to tell me that because Mia wasn’t really up to it I would have to come back another day to finish the photo shoot! Again I should of said no but I thought well at least I’ll be able to get an updated shot of the three of my children! They were very happy for me to bring the three kids back next time! So on the Ekka show holiday I dressed all three up beautifully, bribed them with a donut and we went and finished the photo shoot! I didn’t want to spend much as I wasn’t even going to do portraits this year – I was waiting until next year to get portraits done by Nicole Ramsey! All I wanted was my free photo of the three kids and a 10 x 8 of Mia!

The day came to view my photos and I kept telling myself “you’ll be right, you only want two photos, be strong, say no thank you!” I kept hoping all morning the photos would be awful so it wouldn’t be so hard to resist! Pffft awful photos of my three children, how could that be lol!!! I walked up to the counter all confident with what I wanted and then they placed the photos down for me to view….this is the moment where my heart made a decision over my head! As I looked through each photo, I smiled and commented to the lady and she would nod her head and agree. Each photo was more lovely than the one before. My game plan changed then. I placed in a pile the ones I loved the most. The little voice in my head was still telling me what I was SUPPOSE to do, but my heart kept saying how can I not purchase these beautiful photos of my adorable dumplings!!!!

20120906-162200.jpg
Makes my heart melt!

20120906-162251.jpg
My three precious angels!

20120906-162402.jpg
I love Mia’s face in this one:)

20120906-162456.jpg
Mia looks so tall in this photo!

20120906-162626.jpg
Bailey is like a little man in this photo and Sienna oh so angelic lol!

20120906-162757.jpg
Growing up so fast!

20120906-162849.jpg
Oh so pretty!

20120906-162957.jpg
Mmmwah!

20120906-163039.jpg
Cheeky monkey!

20120906-163140.jpg
I love this one…”I’m a little tea pot!”

Now can you see why the sudden urge of needing to purchase more photos than I wanted overcame me! They are gorgeous, real keepers. I not only purchased this lot of photos, but I am also getting a hard covered large book with 20 of the photos included….that is my present to myself and I shall keep you posted when it arrives:) I’ve displayed some of these photos throughout the house and the left over ones will be given as Christmas presents, so at least I have started Christmas shopping! I’m guessing they are called ‘Gotcha’ photography for a reason because that they did, but when I think about it, it was my beautiful children who really got me:)!

The Touch of a Word!

I love decorating! We’ve been in our house for almost 10 years now and decorating our home never gets old. I’m currently redecorating the kid’s toy room, hopefully it’s only a couple of weeks away from finishing, so keep a look out for my toy room reveal blog! Anyway the point of this blog is to express my new found love of decorative words! It’s amazing how something so simple, rather plain and so reasonably priced can add a new dimension to a room!

I have three decorative words currently scattered throughout the house and they are:

20120829-192838.jpg

20120829-192913.jpg

20120829-192945.jpg

My ‘home’ word resides in the kid’s new toy room. It fits perfectly in a room where the kid’s can play and feel happy, safe and secure in their home! My second word ‘family’ has recently been repositioned and now lives in our lounge room which is the perfect place as we spend a lot of time as a family chilling in this room. My final word ‘love’ occupies our bedroom. Along with photos of our children and ourselves on our wedding day which depicts all the love that we have shared and do share!

I think walking into a room with these words present really adds meaning to a room and symbolises what the room is all about:

20120829-193651.jpg

20120829-193731.jpg

20120829-193810.jpg

I’m on a mission now to find the word ‘laugh’! I think this would finish off my house of words and balance it out nicely! The meaning behind all of this would be….Through ‘love’ and ‘laughter’ we have created a beautiful ‘home’ for our precious ‘family’….something so powerful can be summed up simply with a touch of a word and in this case decorative ones!

These words were purchased at Choice Kuraby for $7.99!

A Starting Point.

5 months ago I decided to start my own blog. The idea came from a thought when I was out running. At first I had plans to create a fitness fan page on Facebook to help motivate other mums who were trying to get their bodies back after having their families. But after talking to my lovely Neighbour Lolly, she suggested blogging. What’s that I ask? Technology is obviously not my biggest strength in life!

After procrastinating for a bit, I decided to give it a go. Lolly helped me create my blog and start me on this new journey – a big shout out to her:) The idea of me starting a blog was to have somewhere to write my life stories and to have someone read them and judge whether my writing is good enough to read! This being because I’d love to write a book one day!

It took me a little while to establish a routine and discipline with producing pieces that sounded good enough to read. I haven’t hit a brick wall with topics yet, everyday something pops up and I write it down. But I am amazed at how much I love blogging. I always preferred maths when I was at school and writing assignments was never something that sparked an interest for me, but now I consider myself a writer!

I’m very appreciative of the support and positive feedback that my audience has given me. Whether it be about the quality of my writing, the layout of my blog or how the pieces I’ve published have been truly touching has enabled me to write with confidence.

Another moment of me not keeping in touch with technology….when Lolly asked me if I was interested in making money from blogging I answered with “can you do that” lol! How did I not know this? Have I been hiding under a rock or something? Lol I never envisioned making money from publishing my blogs. Like my blog’s caption says ‘Life is about learning’ and if I can teach someone something from reading my blogs than I feel like I’ve earnt something by doing that! But recently I received an email from two companies who read and loved my blog and are willing to give me a go! Surprised I surely was, chuffed as well!

It’s nice to know that what I’m writing is worth reading. My aim now is to keep building my audience! With each blog brings about new followers and now that I have started a fan page on Facebook and linked my blog to Twitter and Pinterest, hopefully this will attract a broader range of followers as well! My latest edition to my blog is my logo. I created this to use as the face of my blog….something that people will remember!

So where to from here? I’m just going to keep on living and blogging! Since starting this journey back in March, this is my 31st published piece and I have had over 3500 views of my blog by people right around the world! Hopefully one day my blog is highly recommended around the world, but for now what I’ve achieved so far is a great starting point!

20120712-172906.jpg
My logo I created for my blog:)

Head over to ‘My Party of 5’ fan page on Facebook and ‘like’ my page to keep up to date with everything relating to my blog:)

Sweets FoR mY Sweet!

Birthdays are such a great excuse to experiment with baking and decorating! My darling little girl Sienna turned 4 yesterday and because she is such a sweet little girl that never wants for much, I decided to create something special….her very own sweets table!

20120701-135656.jpg

Sienna is the kind of child who you can take to the shops and she never asks for anything more than a $2 packet of chewy! She has always been like that. Right up until two days before her birthday she still hadn’t really asked for anything for her birthday, she was just so excited that she was turning 4! A few weeks ago, she finally decided she wanted a strawberry shortcake birthday cake, so with some google searches and some tweaking of my own I created her the magical strawberry shortcake birthday cake of her dreams!

20120701-135908.jpg
This is my biggest master piece yet! I love the fact that the strawberry shortcake sitting on top of the cake was mine when I was little….she is almost 30 years old:)

I don’t do big birthday parties every year for our children, we have selected years for that, but we always celebrate a birthday in one way or another. All Sienna wanted to do on her birthday this year, was have a swim at the Runcorn Pool, have a BBQ and jump on her jumping castle! That she did. But I still felt bad because this was the year for her brother and sister to have birthday parties!

20120701-135727.jpg

One way to Sienna’s heart is food and sweet food at that! Sweets/dessert tables are so much fun and I thank my friend Michelle Shaw for her inspiration of them! Because of the strawberry shortcake theme cake, I based my table theme, colours and food around that! The colours I choose were hot pink and green with flowers for a touch of decoration and the food was either strawberry related or pink in colour.

This is how it all turned out:
The food:)

20120701-135756.jpg
Home made marshmallow….so easy to make!

20120701-135815.jpg
Star shaped fairy bread….for my little shining star!

20120701-135834.jpg
Caramel cupcakes finished with vanilla icing and a strawberry and pikelets with jam and cream!

20120701-135825.jpg
Jam drop biscuits, smartie cookies and strawberries dipped in chocolate!
Other foods on her table included her favourite things: popcorn, Cheerios, watermelon, chips and dip!

The decorating:

20120701-135855.jpg
I decorated a toy storage container to display her name and made a sign to say she was 4:)

20120701-135847.jpg
Everything I used from bowls to cups to the glass water bottles were in the theme colours of hot pink and green! I even decorated a special cup for Sienna to use:)

20120701-135901.jpg
I created little name tags for the food. As a table cloth, I used a hot pink piece of material I had in the cupboard and cut out green felt circles and scattered than out first before I put everything out!

20120701-135922.jpg
The day was a huge success and my reward was seeing how much joy was expressed on my sweet little girl’s face all day long!

20120701-144319.jpg
Happy 4th birthday my Sie Sie girl…you are the light that shines in our party of 5!

Stay tuned in the coming days when I shall blog some of the recipes I’ve used over the school holidays!

Making it Work!

When asked the question – what do you want in a house? most people say 4 bedrooms, 2 bathrooms, 2 living areas, double lock up garage and the like! We are at the point in our lives where those things would be perfect, but you have to live within your means, so for now we have to just make do!

I love our house. It will always have a special place in my heart because it is the first home we bought and the first home our three cherubs have lived in. Our home only has three bedrooms, so when I fell pregnant with Mia we had to make some decisions. Of course we thought about moving. But with moving comes the extra expenses, bigger mortgage and we like to live comfortably so decided to make do with what we have.

One option was to create a space in our room for the baby so Bailey and Sienna could keep their own rooms. I wasn’t really keen on that option….a husband and wife deserve their own space where they can retire to at the end of a busy day! Another option was to put the girls in together, but knowing a newborn wakes so frequently, I didn’t want my eldest daughter to be disturbed by that. So the final option which the kids were all for, was for Bailey and Sienna to share!

At first I wasn’t keen. My husband preferred not either, but is was the most common sense option and I was determined to make it work! We discussed with the kids what they wanted in terms of themes and colours. I had this idea where I wanted to divide the room straight down the middle and one side be a girl’s theme and the other be a boy’s theme. The kids loved that idea so that is what we did! They both kept the theme they had in their own rooms – African animals for Bay and butterflies and flowers for Sie:)

This is how it turned out:

20120626-115647.jpg
Bailey has one half of the room and Sienna has the other half!

20120626-115919.jpg
Bailey’s side:)

20120626-120018.jpg
Sienna’s side:)

20120626-120127.jpg
I chose photos to put on the door that depict how close and inseparable they can be:)

20120626-120303.jpg
This is my favourite photo of them. They have taken to sharing a room way better than I thought! Good learning curve for them too:)

It’s been 18 months since Bay and Sie started sharing and they both never complain about it. They love the comfort of another person in the room at night when they are sleeping, which may be a concern when they are separated! There were some teething problems at the beginning with going to sleep and waking each other in the mornings, but like anything new they settled quite quickly. The only thing that has been a challenge is a timeout area. Our kids are sent to sit on their bed for timeout so if they are both sent (which has only been a few times) one goes to the laundry and the other their bed!

Sometimes in life we are faced with situations that aren’t always ideal, but you just have to make do and make it work, until the time is right to get exactly what you want! The next move for us will be to either put the girls in together, move to a bigger house or keep renovating our home and build on an extension. I don’t have my heart set on anything at this stage, as long as we are happy, healthy and together…that is all that matters!

A Love Story!

I love to decorate! We have lived in our house for almost 10 years now and each room has had many different makeovers throughout the duration of that time. My latest project, that I started a few months ago, is finally finished – our bedroom!

When I decorate a room I like to base it around a theme. Kids rooms are easy when it comes to themes – African animals, under the sea and butterflies and flowers are a few I’ve done so far, but an adult’s room, male and female, who have different interests, not as easy! But one thing that my husband and I do have in common is our love that we share for each other and our children, so I went with a ‘love story’ theme for our bedroom makeover!

20120502-124107.jpg

I LOVE the wooden words out at the moment….things brings the whole room together!

Kane and I are high school sweethearts and have been together for almost 15 years. We have built our marriage around the foundations of love, trust, loyalty and happiness and now we are parents to three precious angels, we are using these foundations to help raise our children. We have been through a lot throughout our relationship, like any couple we have had plenty of ups and downs, but at the end of the day we love and support each other no matter what! Kane is and will always be my best friend who I share everything with and most importantly can laugh at anything with. We have achieved so many wonderful things and made so many beautiful memories so far. It makes me so excited at the thought of our future and all the great things that lie ahead of us!

20120502-130806.jpg

My handsome hubby and I….can’t imagine life without him!

To create my ‘love story’ theme, I included all the things in our relationship that symbolise our love and placed them throughout our room….here’s how it turned out:

20120502-132210.jpg

My new canvas creations of our babies who we LOVE more than life itself!

20120502-132518.jpg

A wedding photo from the day we declared our LOVE for each other!

20120502-132619.jpg

A pregnancy shot to symbolise that our children were made from pure LOVE!

20120502-132719.jpg

Our ring pillow from our wedding day (that my wonderful mother made) and a teddy from the kids always sits nicely in the centre of my bed.

20120502-132825.jpg

I LOVE my new doona cover:)

20120502-132922.jpg

My favourite part of the room….the feature wall that holds my babies!

20120502-133002.jpg

By moving my chest of drawers its given the room a lot more space!

20120502-133439.jpg

Neat and simple with the precious things in life!

20120502-210453.jpg

The final piece to this puzzle that I added yesterday….a picture of our hands to symbolise team Trew united….a bond no one can ever break!

I’m really happy with how our bedroom has turned out and I’m most happy with how the memories we’ve created can be relished when we retire to our bedroom at the end of our busy day!